通過Keepalived配置,實現MySQL集群高可用性。在主機之間免密管理,通過Ansible批量操作。安裝MySQL使用rpm包,通過yum命令直裝。通過Ansible配置MySQL服務組,進行批量操作。
需求描述
為了防止MySQL集群在雙主模式下可能出現的單點故障風險,利用Keepalived進行配置,從而實現MySQL集群的高可用性。
環境準備
|
|
|
|---|---|
|
|
|
|
|
|
|
|
|
|
|
|
配置主機之間免密
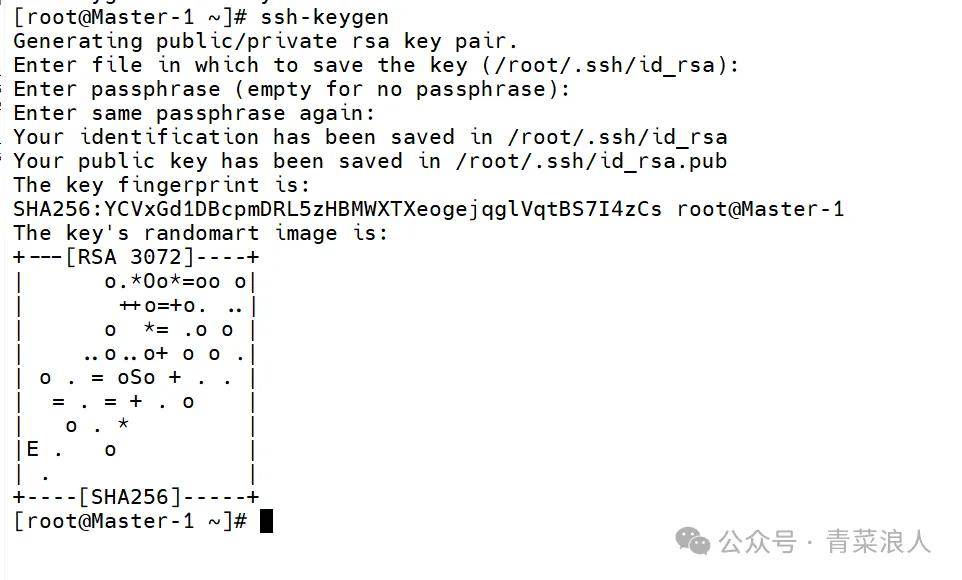
1.使用ssh-keygen在Master-1上生成秘鑰
ssh-keygen
修改hosts文件,添加主機名映射(將Master-1作為控制節點)
vim /etc/hosts

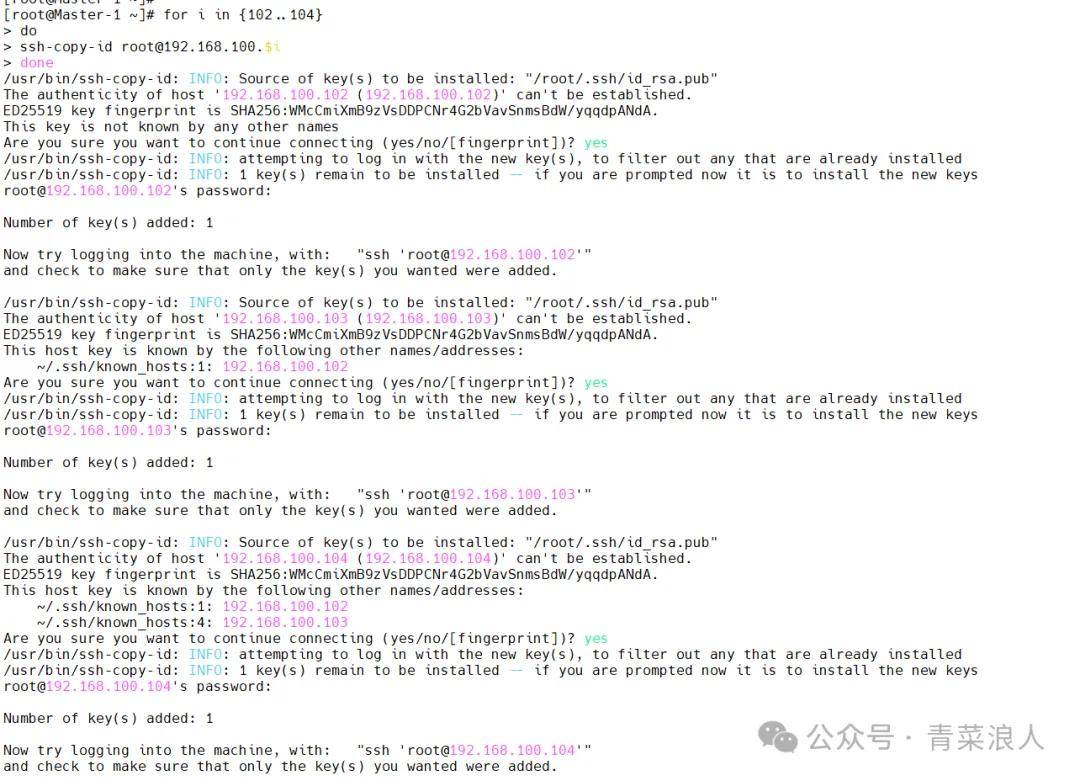
拷貝秘鑰,實現Master-1免密管理其他三臺主機
for i in {102..104}; do ssh-copy-id root@192.168.100.$i; done
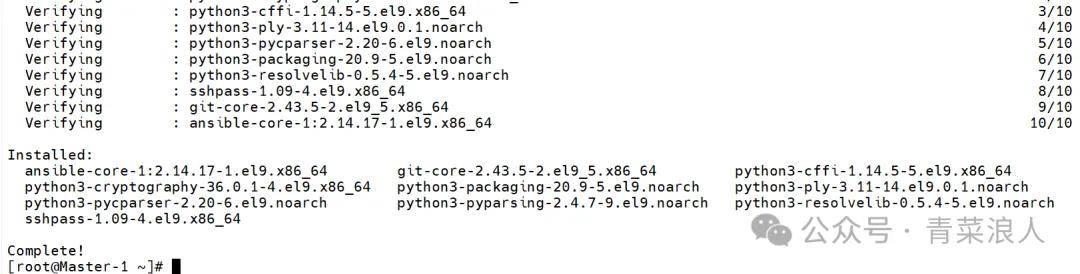
安裝Ansible
利用Ansible批量管理,Master-1作為控制節點對其他三臺主機做批量操作。
1.安裝Ansible
dnf install ansible-core
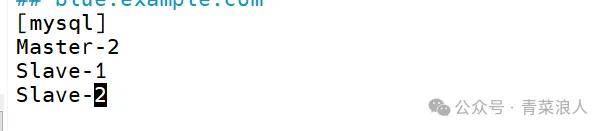
2.添加服務組
#在文件末尾添加如下參數
vim /etc/ansible/hosts
[mysql]
Master-2
Slave-1
Slave-2
3.ping測試,全綠表示免密成功,且主機之間通訊沒有問題。
ansible mysql -m ping
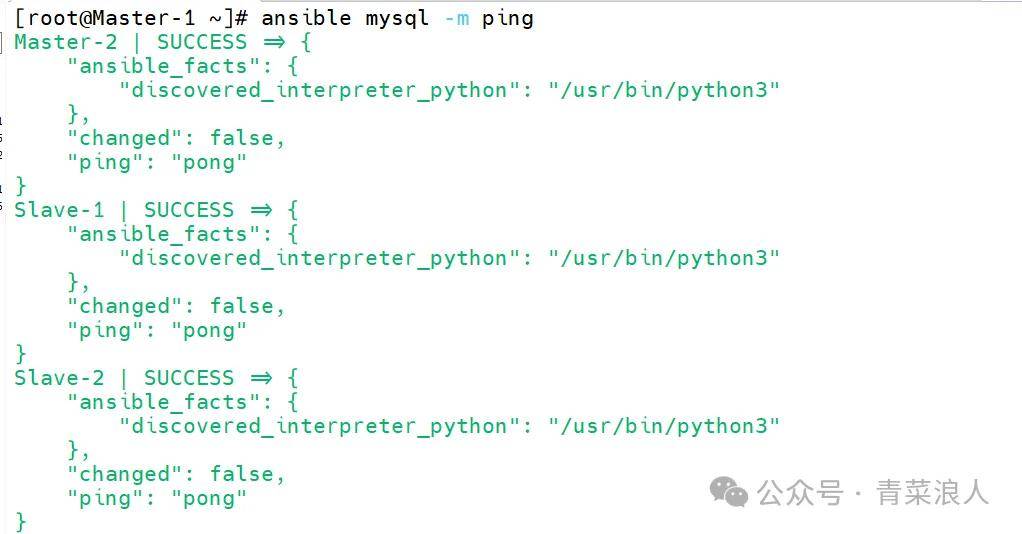
image-20241230151818273
安裝mysql
我這里采用rpm包進行安裝,在4臺虛擬機上進行安裝
#mysql下載地址
https://dev.mysql.com/get/Downloads/MySQL-8.0/mysql-8.0.33-1.el9.x86_64.rpm-bundle.tar
這里已經配置好本地yum倉庫,使用yum命令直裝
#Master-1節點執行
dnf localinstall *.rpm
ansible mysql -m shell -a "dnf localinstall *.rpm -y"

啟動并修改mysql密碼
systemctl start mysqld
#獲取默認密碼
cat /var/log/mysqld.log |grep password|awk '{print $NF}'

修改密碼
mysql --connect-expired-password -uroot -p"pM8t>RW:TtB>" -e "alter user 'root'@'localhost' identified by 'Qclr@123';flush privileges;"
使用ansible啟動其他三臺主機的mysql服務
#啟動mysql
ansible mysql -m shell -a "systemctl start mysqld"

獲取默認密碼
ansible mysql -m shell -a "cat /var/log/mysqld.log |grep password|awk '{print \$NF}'"
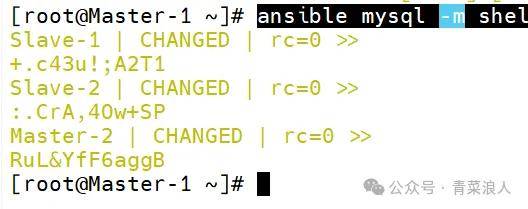
修改密碼,這里為了方便操作,將密碼進行統一
ansible mysql -m script -a "/root/reset_mysqpasswd.sh"
#批量腳本內容
#!/usr/bin/env bash
list=(
"+.c43u!;A2T1"
":.CrA,4Ow+SP"
"RuL&YfF6aggB"
)
for i in${list[@]}
do
name=$(hostname)
if [[ $name == "Master-2" ]];then
mysql --connect-expired-password -uroot -p"$i" -e "alter user 'root'@'localhost' identified by 'Qclr@123';flush privileges;"
elif [[ $name == "Slave-1" ]];then
mysql --connect-expired-password -uroot -p"$i" -e "alter user 'root'@'localhost' identified by 'Qclr@123';flush privileges;"
elif [[ $name == "Slave-2" ]];then
mysql --connect-expired-password -uroot -p"$i" -e "alter user 'root'@'localhost' identified by 'Qclr@123';flush privileges;"
else
echo"bey~"
exit 1
fi
done
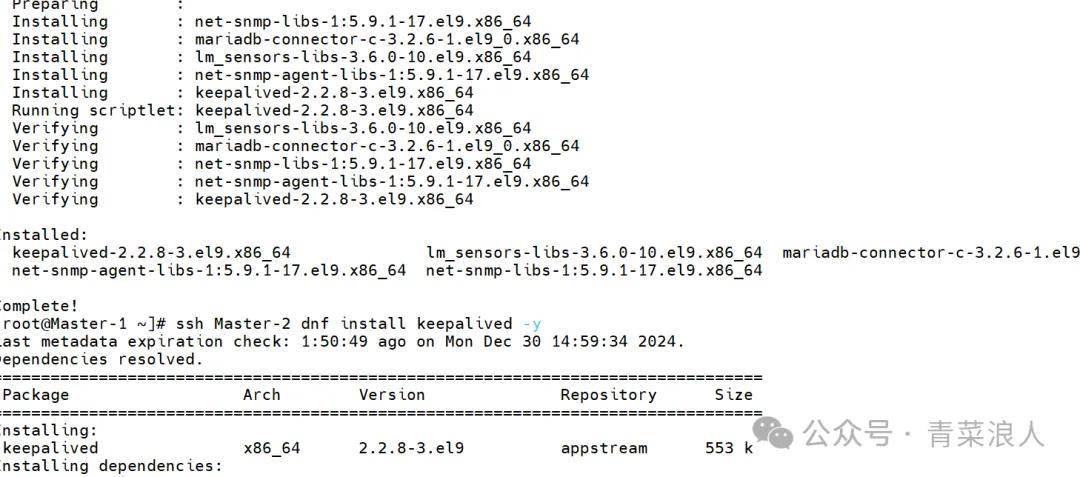
安裝keepalived
通過配置Keepalived在MYSQL雙主模式下實現VIP(虛擬IP)的動態漂移,以確保MYSQL數據庫的高可用性。
1.在Master-1和Master-2上安裝keepalived
dnf install keepalived -y
ssh Master-2 dnf install keepalived -y
修改配置文件,確定主備關系
! Configuration File for keepalived
global_defs {
router_id 1
script_user root
enable_script_security
}
vrrp_script check_mysql {
script "/etc/keepalived/check_mysql.sh"
interval 3
weight -50
fall 2
rise 1
}
vrrp_instance VI_1{
state MASTER
interface ens160
mcast_src_ip 192.168.100.101
virtual_router_id 51
priority 101
advert_int 2
authentication{
auth_type PASS
auth_pass 123
}
virtual_ipaddress{
192.168.100.254/24
}
track_script{
check_mysql
}
}
編寫檢測腳本,當發現mysql進程不存在時,關閉keepalived實現VIP切換
#!/usr/bin/env bash
if pgrep mysqld 1>/dev/null ;then
true
else
systemctl stop keepalived.service
exit 1
fi
將配置文件拷貝至Master-2
scp -r /etc/keepalived/* Master-2:/etc/keepalived/

修改Master-2配置文件,將其設置為備份主機
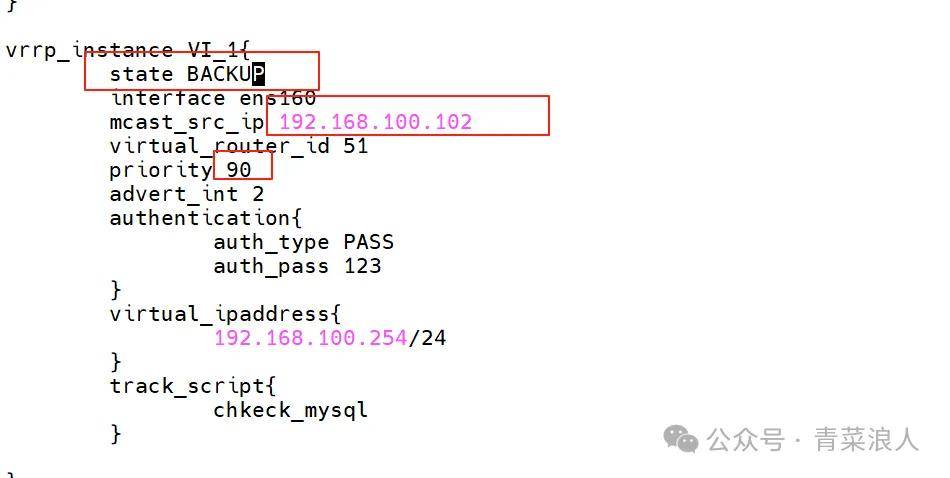
啟動服務,可以看到此時的vip在Master-1上
systemctl start keepalived

配置mysql主從復制
配置Master-1
修改Master-1服務器的mysql配置文件
vim /etc/my.cnf
#添加以下內容↓↓↓
server_id=101
binlog-ignore-db=mysql
log-bin=mall-mysql-bin
binlog_cache_size=1M
binlog_format=mixed
expire_logs_days=7
slave_skip_errors=1062
#開啟GTID
gtid_mode=ON
enforce_gtid_consistency=ON
添加完畢后重啟mysql服務,使配置生效
systemctl restart mysqld
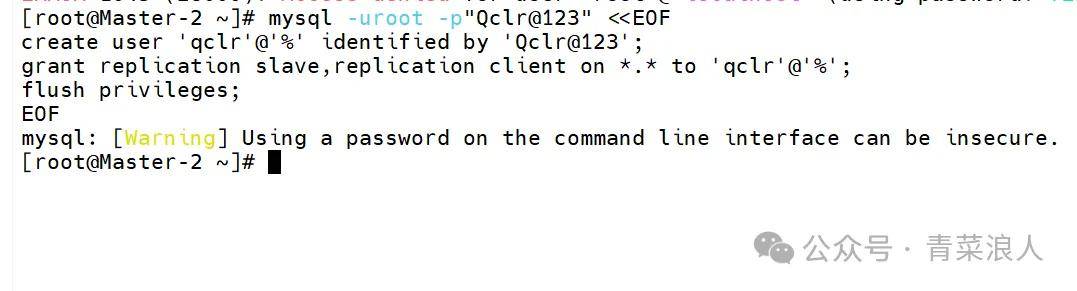
創建數據庫同步用戶,并賦予權限
mysql -uroot -p"Qclr@123" <<EOF
create user 'qclr'@'%' identified by 'Qclr@123';
grant replication slave,replication client on *.* to 'qclr'@'%';
flush privileges;
EOF

配置Master-2
修改Master-2服務器的mysql配置文件
vi /etc/my.cnf
#添加以下內容↓↓↓
server_id=102
binlog-ignore-db=mysql
log-bin=mall-mysql-bin
binlog_cache_size=1M
binlog_format=mixed
expire_logs_days=7
slave_skip_errors=1062
#開啟GTID
gtid_mode=ON
enforce_gtid_consistency=ON
添加完畢后重啟mysql服務,使配置生效
systemctl restart mysqld
與Master-1一樣,創建一個數據庫同步用戶,并賦予權限
mysql -uroot -p"Qclr@123" <<EOF
create user 'qclr'@'%' identified by 'Qclr@123';
grant replication slave,replication client on *.* to 'qclr'@'%';
flush privileges;
EOF
配置slave-1
修改mysql配置文件,添加如下內容
vim /etc/my.cnf
## 設置 server_id,同一局域網中需要唯一
server_id=103
binlog-ignore-db=mysql
log-bin=mall-mysql-slave1-bin
binlog_cache_size=1M
binlog_format=mixed
expire_logs_days=7
slave_skip_errors=1062
relay_log=mall-mysql-relay-bin
read_only=1
#開啟GTID
gtid_mode=ON
enforce_gtid_consistency=ON
重啟mysql服務使配置文件生效
systemctl restart mysqld
配置主從同步
登錄slave節點,指定Master數據庫信息
mysql -uroot -p"Qclr@123"<<EOF
change replication source to source_host='192.168.100.254',source_port=3306,source_user='qclr',source_password='Qclr@123',source_auto_position=1;
start slave;
flush privileges;
EOF
#開啟主從同步
mysql> start slave;
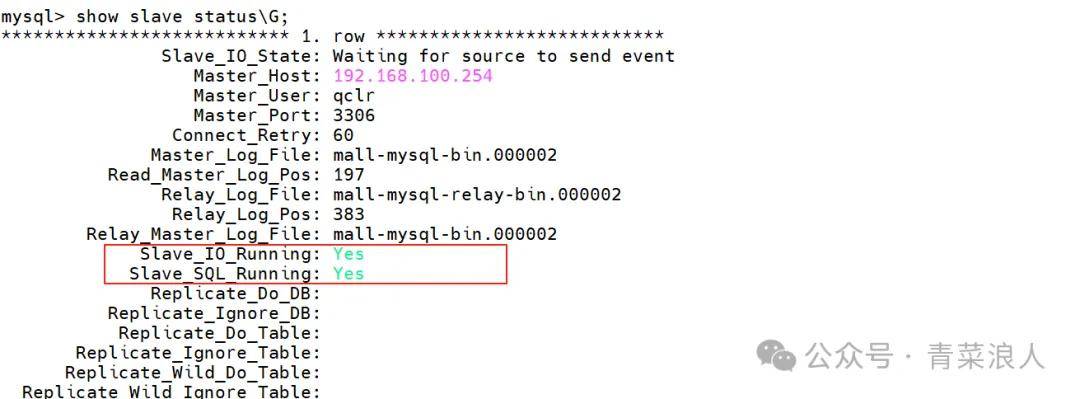
#查看從數據庫是否開啟同步
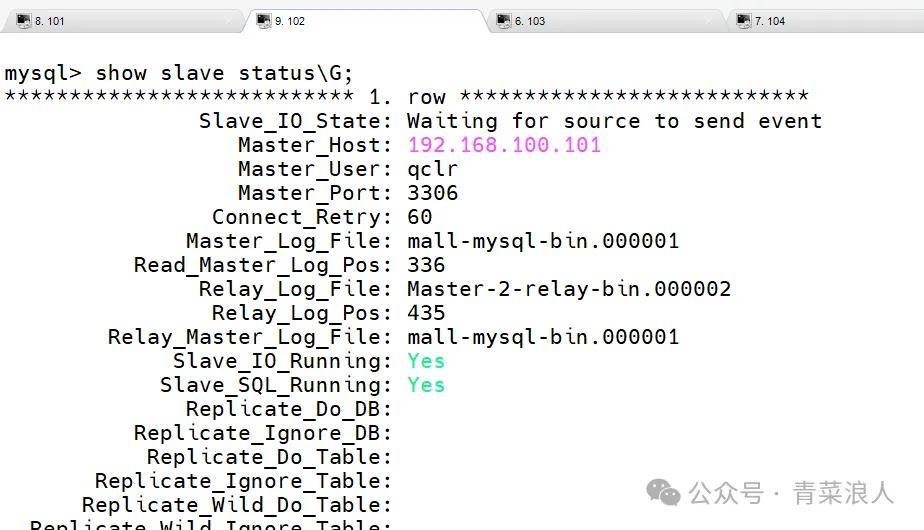
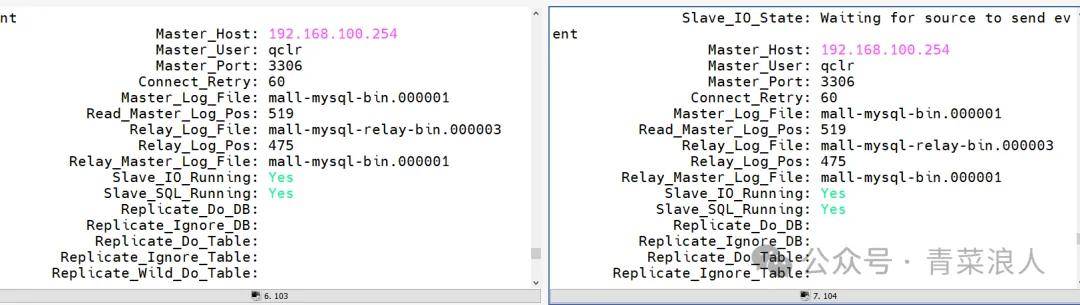
mysql> show slave status \G;
#如配置出錯,則需要先停止再重置
stop slave
reset slave
reset master
出現下圖兩個YES,表示配置成功
配置Slave-2
修改mysql配置文件,添加如下內容
vim /etc/my.cnf
## 設置 server_id,同一局域網中需要唯一
server_id=104
binlog-ignore-db=mysql
log-bin=mall-mysql-slave1-bin
binlog_cache_size=1M
binlog_format=mixed
expire_logs_days=7
slave_skip_errors=1062
relay_log=mall-mysql-relay-bin
read_only=1
#開啟GTID
gtid_mode=ON
enforce_gtid_consistency=ON
重啟mysql服務使配置文件生效
systemctl restart mysqld
登錄slave節點,指定Master數據庫信息
mysql -uroot -p"Qclr@123"<<EOF
change replication source to source_host='192.168.100.254',source_port=3306,source_user='qclr',source_password='Qclr@123',source_auto_position=1;
start slave;
flush privileges;
EOF
#開啟主從同步
mysql> start slave;
#查看從數據庫是否開啟同步
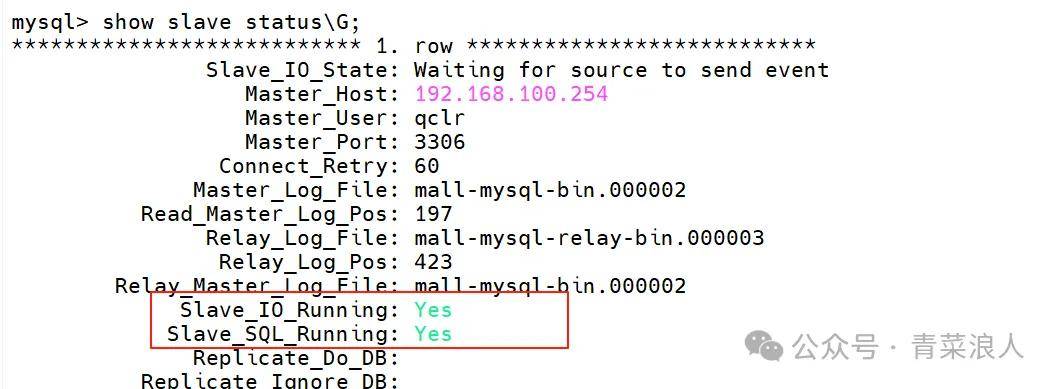
mysql> show slave status \G;
配置Master之間互為主從關系
注:為了防止雙主情況下數據庫生成的主鍵沖突,在MYSQL數據庫中設置Master-1和Master-2的自增初始值(auto_increment_offset)分別為1,2,設置增長步長(auto_increment_increment)都為2
#Master-1配置文件末尾添加如下內容
auto_increment_increment=2
auto_increment_offset=1
#Master-2配置文件末尾添加如下內容
auto_increment_increment=2
auto_increment_offset=2
1.配置兩個主節點之間互相復制數據
#Master-1
mysql -uroot -p"Qclr@123"<<EOF
change replication source to source_host='192.168.100.102',source_port=3306,source_user='qclr',source_password='Qclr@123',source_auto_position=1;
start slave;
flush privileges;
EOF
#Master-2
mysql -uroot -p"Qclr@123"<<EOF
change replication source to source_host='192.168.100.101',source_port=3306,source_user='qclr',source_password='Qclr@123',source_auto_position=1;
start slave;
flush privileges;
EOF
#開啟主從同步
mysql> start slave;
#查看從數據庫是否開啟同步
mysql> show slave status \G;
Master-1
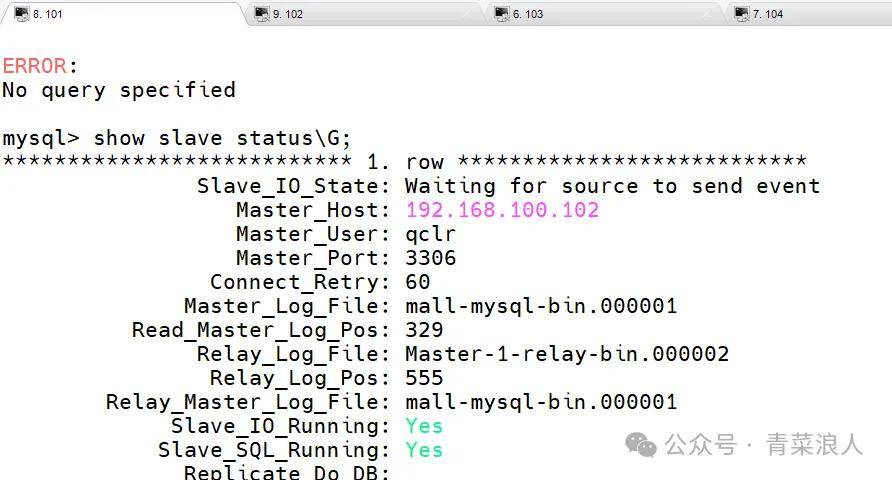
Master-2
效果測試
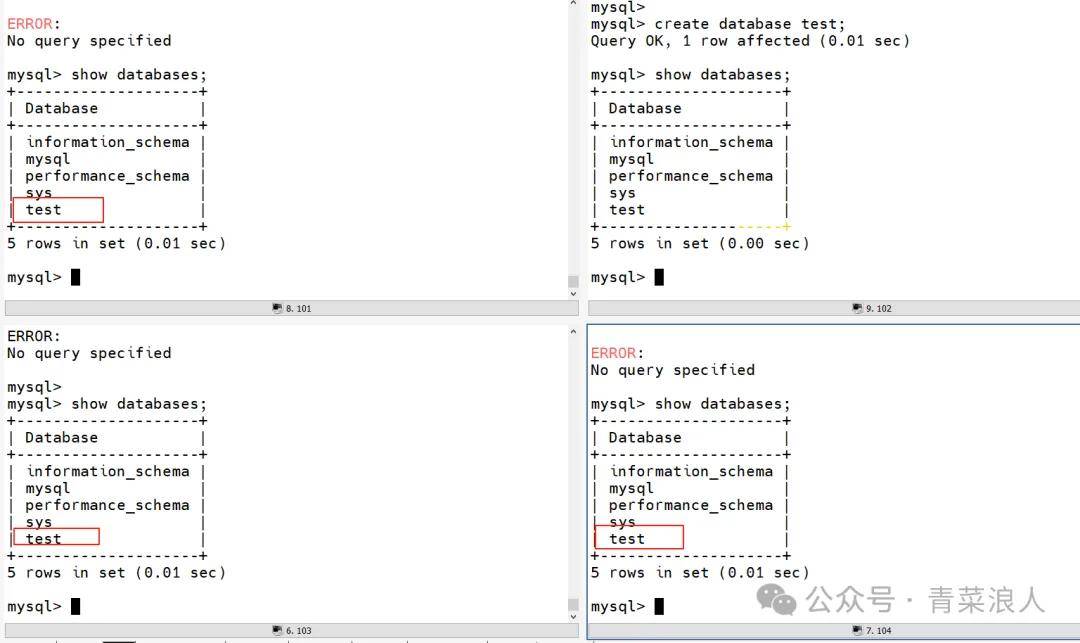
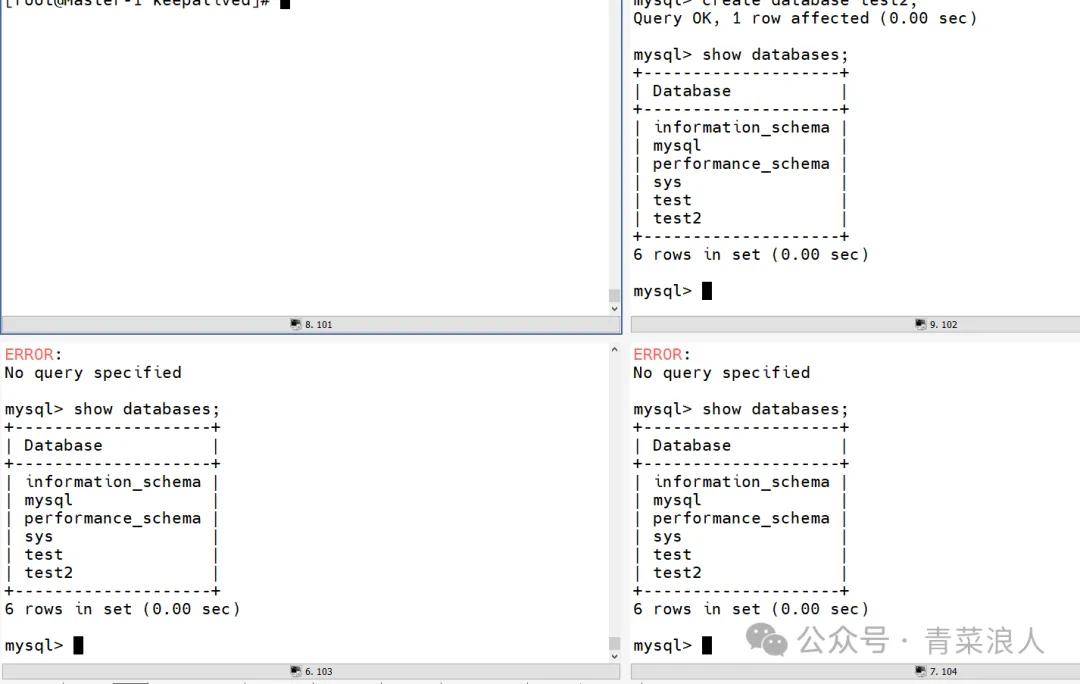
在Master-2創建新數據庫
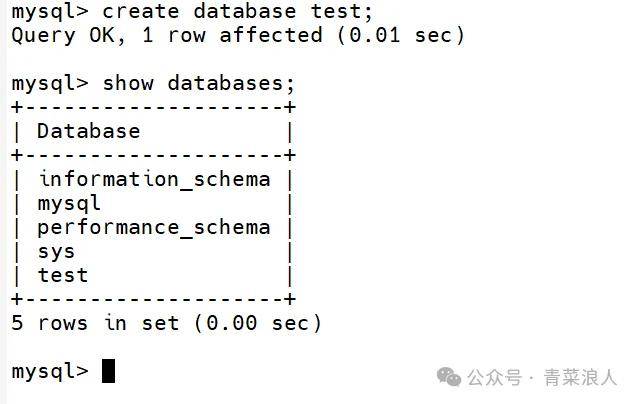
在其他三個節點上查看,可以看到數據已被同步
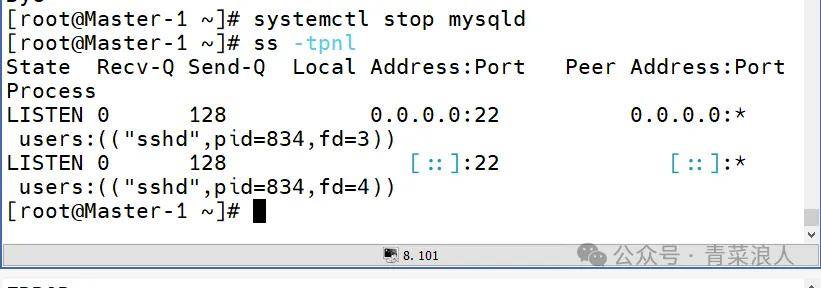
模擬Master-1故障,查看vip是否會切換至Master-2
關閉Master-1的mysql服務
在Master-2查看,可以看到VIP已切換至Master-2

查看slave-1和2的同步狀態,可以看到從庫不受影響,同步狀態正常
再次創建數據庫測試,主從同步正常
原文來源:https://mp.weixin.qq.com/s/T7Go5Krw2L_JFlXa0yzBpQ
來源:本文內容搜集或轉自各大網絡平臺,并已注明來源、出處,如果轉載侵犯您的版權或非授權發布,請聯系小編,我們會及時審核處理。
聲明:江蘇教育黃頁對文中觀點保持中立,對所包含內容的準確性、可靠性或者完整性不提供任何明示或暗示的保證,不對文章觀點負責,僅作分享之用,文章版權及插圖屬于原作者。


聯系郵箱:service#改成@jsedu114.com
地 址:中國●江蘇
南京市秦淮區洪武路359號1506室
Copyright©2013-2025 ?JSedu114 All Rights Reserved. 江蘇教育信息綜合發布查詢平臺保留所有權利
![]() 蘇公網安備32010402000125
蘇ICP備14051488號-3技術支持:南京博盛藍睿網絡科技有限公司
蘇公網安備32010402000125
蘇ICP備14051488號-3技術支持:南京博盛藍睿網絡科技有限公司
南京思必達教育科技有限公司版權所有 百度統計


 新浪微博
新浪微博